|
File Menu in Illustrator

File menu is just like a gate of the program, it helps to make multiple new file, open created file and save in different format then print the document. You can also make different setting for document as required by using “Document Setup”.
This is basic guide information about file menu; we will discuss only different and common function as provided.
New
After open program click on file menu and select new option, A pop up would come on the screen and there are different type of properties and you have to make changes of their values according to your requirement.
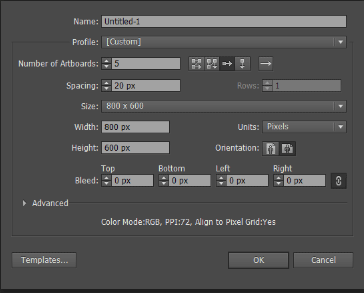
In the “Name” property, you have to type a name which will be your final document name so choose right name as suitable.
In the “Profile” property, you have to select the mode of document. There are some different types of format of the document. Their format has been set by default so you need just select and press “Ok”. If you want your own setting of format the document, go for still selected “custom” option.
In the “Number of Artboards” property, you can open more than one artboard on a single screen to control and work on all of them. It becomes very important part at that time when you work on different project of document simultaneously. There are given some option at the right side to arrange the right direction of your artboard.
In the “Spacing” and “Columns” properties, you can adjust the spacing and columns of artboard as you required and comfortable to work easily.
In the “Size” property, there are given predefined size for you canvas. You can select one of them for your convenience. At the selected custom, you have to adjust the width and height according to your requirement for your own size of canvas.
There are given some parameter in “Units” property, select one of them. There is also one of more option that is “Orientation”. It is used to place you document horizontally and vertically.
In the “Bleed” property, bleed is usually showed to make edge of the object in the document. It is very important and a mark to cut right side of the object. You can adjust the bleed point of the document four sides as you need.
Let’s talk about advanced option.
In the “Color Mode” property, there are two type of color mode “RGB” and “CMYK”. RGB is the color combination of red, green and black. It is mainly used in web industries like website, mobile application and software etc.
CMYK is the color combination of cyan, magenta, and yellow and black, it is mainly used in print media like visiting card, catalogue, and banner etc.
In the “Raster Effect” property, you can see some PPI settings option and you have to select one of them but first of all you should have to decide what type of document you are going to create. It you go for print your document, you should have to choose 300ppi and for web select 72ppi. These PPI value show the quality of you project.
New From Template
It provides us many pre designed template on different categories, these are saved in illustrator database you can access and select any one of them and make edit. These are designed to show professional work of skill and it can be a guide for beginner.
Revert
It is just like undo, but there are some differences. Revert is used to apply when you need to go last save position of your current document. It can be applied only one time after start work and not applicable on opened document.
Place
The place function is a primary method that is used to insert any picture and graphic into your canvas. It supports many type of file format like jpg, png, gif and psd etc.
Some time you work one and more object and then you need to combine them on a single canvas or insert any special picture on, you need a special option for that so the place function is given in the menu of illustrator.
Save for Microsoft
This function is used when you required some vector graphic and text for use in the Microsoft word document. After done work in illustrator, go to file menu > Save for Microsoft. Go to insert menu and choose picture button in word then choose file path and press “Ok”.
Export
This function is used to export your illustrator document in different format for use in print and import on different platform of software.
Scripts
This function has a list of commands that guides the program to work on one and more task. These tasks can be applied on single object or all abject as in you document.
Document Setup
The document setup provides a wide range of document settings; the adobe gives you by default document setup for beginner. If you need different settings of your document, just to to file menu and choose document setup function and make changes as required.
|