|
White Glass Navigation
Hi
I have created a white glass web navigation bar in Photoshop cs6 on the black background web page. I will use layer style with different technique to create an effective design, it is an useful tutorial for beginner so let's start.
Start with a new document and take appropriate size as your project required,
I have taken width = "400px" height = "200px" document
size.

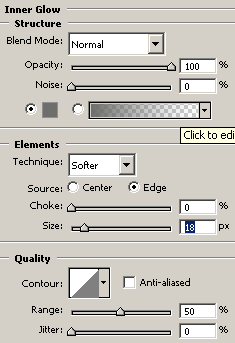
Apply inner glow in the rounded shape, select shape layer and follow this
path (Layer menu > Layer style > Inner Glow) and adjust all the settings
as given below picture.

The picture would look like this.

Select Rectangle tool (U key) and draw little rectangle shape on the top of
the rounded shape with white color.

Now select Line tool (U key) and draw four lines with "#999898"
color on the rounded shape and put shame distance to look like segment of the
shape.

Select Horizontal type tool (T key) and adjust formatting then type in
between two lines as Manu navigation that is your final result.

Santosh Kumar
This is santosh kumar living in New Delhi (India) and love to work as a Web & Graphic Designing. I like to create sketch, background, illustration and vector graphics. Tutorialbunch.com is a very good place where I express my creativity.
|